Ingest MQTT Data into Amazon S3 Tables
Note
The Amazon S3 Tables data integration is available for EMQX version 5.91 and later in the Dedicated Flex edition.
Amazon S3 Tables is a purpose-built storage solution optimized for analytics workloads. It provides high-performance, scalable, and secure storage for tabular data, such as IoT sensor readings, in the Apache Iceberg format.
EMQX Cloud now supports seamless integration with Amazon S3 Tables, enabling efficient storage of MQTT messages into S3 table buckets. This integration allows for flexible and scalable IoT data storage, facilitating advanced analytics and processing using AWS services like Amazon Athena, Amazon Redshift, and Amazon EMR.
This page provides a detailed introduction to the data integration between EMQX Cloud and Amazon S3 Tables and offers practical guidance on the rule creation.
How It Works
EMQX Cloud integrates with Amazon S3 Tables to enable real-time, structured ingestion of MQTT data into Amazon S3 for long-term storage and analytics. This integration leverages EMQX Cloud’s rule engine and S3 Tables action to transform and stream MQTT messages directly into Apache Iceberg-formatted tables stored in S3 Table Buckets.
In a typical IoT scenario:
- EMQX Cloud acts as the MQTT broker, handling device connectivity, message routing, and data processing.
- Amazon S3 Tables serves as the destination for durable, queryable storage of MQTT message data in tabular form.
- Amazon Athena is used to define Iceberg tables and run SQL queries against the stored data.
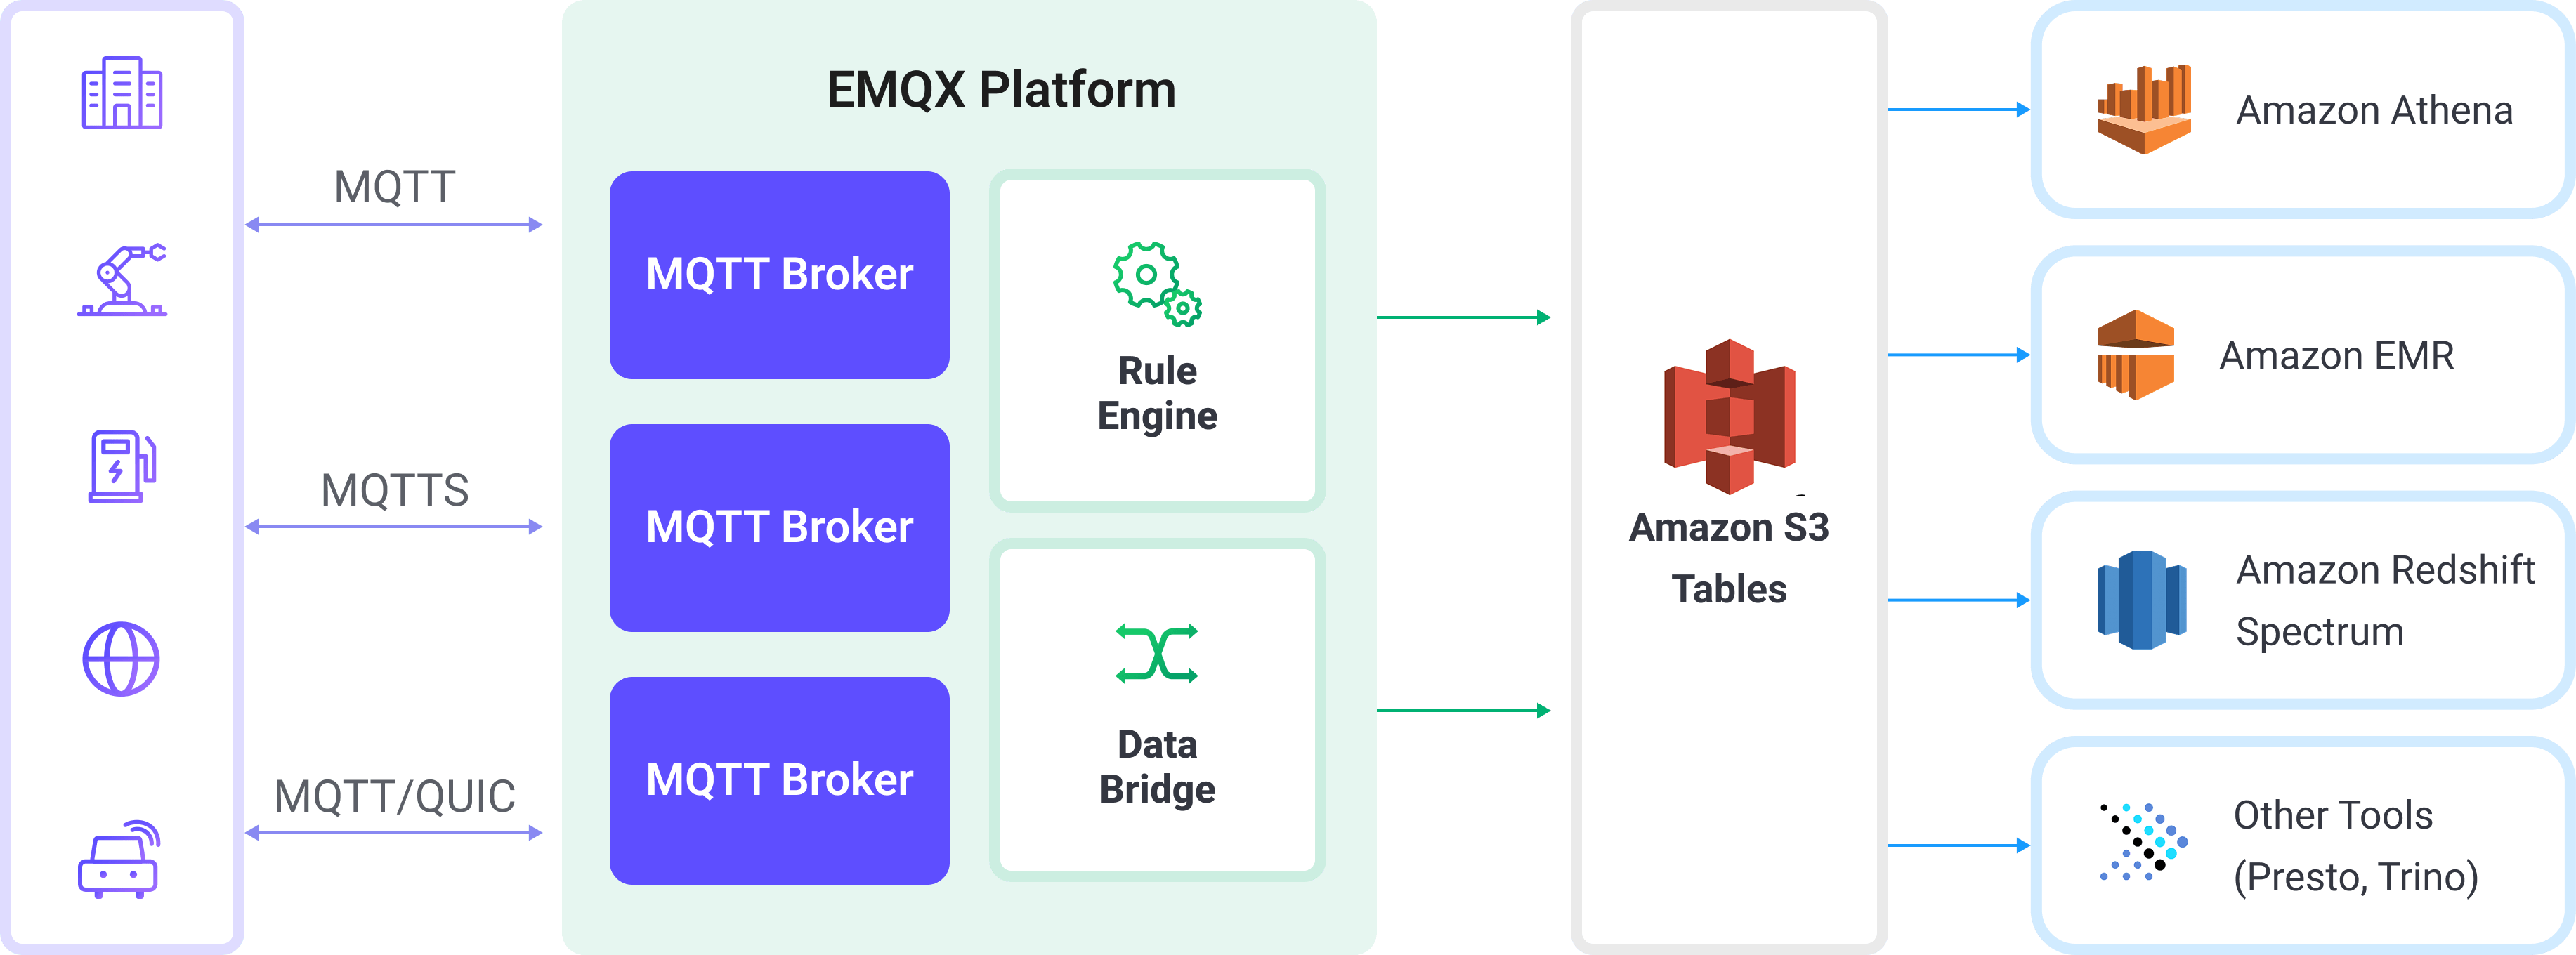
The workflow proceeds as follows:
- Device Connection to EMQX Cloud: IoT devices connect to EMQX via MQTT and begin publishing telemetry data.
- Message Routing and Rule Matching: EMQX uses its built-in rule engine to match incoming MQTT messages against defined topics and extract specific fields or values.
- Data Transformation: Rules in EMQX can filter, transform, or enrich message payloads to match the schema of the target Iceberg table.
- Writing to Amazon S3 Tables: The rule triggers the S3 Tables action, which batches the transformed data and sends it to Amazon S3 Tables using the Iceberg-compatible write API. Data is persisted as Parquet files under Iceberg table partitions.
- Query and Analytics: Once ingested, data can be queried with Amazon Athena, joined with other datasets, or analyzed using Redshift Spectrum, Amazon EMR, or third-party analytics engines such as Presto and Trino.
Features and Advantages
Using Amazon S3 Tables data integration can bring the following features and advantages to your business:
- Real-time Stream Processing: EMQX Cloud's rule engine allows real-time extraction, transformation, and conditional routing of MQTT messages before delivery to S3 Tables.
- Iceberg-Based Storage in S3: Messages are written to Apache Iceberg tables, eliminating the need for traditional databases while enabling SQL-like access patterns.
- Easy Integration with Analytics Tools: Once data is in S3 Tables, you can query it using Amazon Athena (SQL), Amazon EMR, Redshift Spectrum, or third-party engines like Presto, Trino, or Snowflake.
- Flexible and Cost-Efficient Storage: Amazon S3 provides highly durable, low-cost object storage, ideal for archiving, compliance, and time-series analytics on device-generated data.
Before You Start
This section introduces the preparations required for creating an Amazon S3 Tables integration in the EMQX Cloud.
Prerequisites
Before proceeding, make sure you are familiar with the following:
EMQX Concepts:
- Rule Engine: Understand how rules define the logic for extracting and transforming data from MQTT messages.
- Data Integration: Understand the concept of connectors and sinks in EMQX data integration.
AWS Concepts:
If you're new to AWS S3 Tables, review the following key terms:
- Table Bucket: A specialized S3 bucket used for storing Iceberg-based table data and metadata in S3 Tables.
- Amazon Athena: A serverless query engine that lets you run SQL queries directly on data stored in Amazon S3. Athena supports standard SQL syntax, including Data Definition Language (DDL) statements such as
CREATE TABLEto define schema and structure for querying. - Catalog: A metadata container in Athena that organizes databases (namespaces) and tables.
- Database (Namespace): A logical group of tables under a catalog.
- Iceberg Table: A high-performance, transactional table format for data lakes. It supports schema evolution, partition pruning, and time travel queries.
Network Settings
Since EMQX accesses Amazon S3 through public network, you need to enable NAT Gateway in your deployment. Click VAS from the top menu bar and select the NAT Gateway card, or you can select Enable NAT Gateway service in the bottom tab bar of the Deployment Overview page.
Prepare an S3 Tables Bucket
You need to prepare the destination of MQTT data in AWS S3 Tables, including:
- A Table Bucket to store the actual data files.
- A Namespace to logically group related tables.
- An Iceberg-based Table to receive structured MQTT data.
Log into the AWS Management Console.
Go to the S3 service. In the left navigation pane, click Table buckets.
Click Create table bucket. Enter a name for your table bucket (e.g.,
mybucket) and click Create table bucket.After the bucket is created, click on it to go the the Tables list.
Click Create table with Athena. A pop-up should appear asking for the namespace.
Select Create a namespace. Provide a namespace name and confirm creation.
After the namespace is created, continue by clicking Create table with Athena again.
Define your Iceberg table schema:
Click Query table with Athena. In the Query editor:
- Select your Catalog (e.g.,
s3tablescatalog/mybucket, if your bucket is namedmybucket) from the Catalog selector. - Select the namespace you've just created from the Database selector.
- Select your Catalog (e.g.,
Execute the following DDL to create your table and ensure the table type is set to
ICEBERG. For example:sqlCREATE TABLE testtable ( c_str string, c_long int ) TBLPROPERTIES ('table_type' = 'ICEBERG');This defines an Iceberg-based table that will be used to store structured MQTT data from EMQX.
Verify the table. To ensure the table has been successfully created and is currently empty, run:
sqlselect * from testtableTIP
Make sure the correct Catalog and Database (namespace) are selected in Athena before executing any SQL. This ensures the table is created in the intended S3 Table Bucket.
Create a Amazon S3 Connector
Before adding the S3 Tables rule, you need to create the corresponding connector to allow the EMQX Cloud to send data to the S3 Tables.
- Go to your deployment. Click Data Integration from the left-navigation menu.
- If it is the first time for you to create a connector, select S3 Tables under the Data Persistence category. If you have already created connectors, select New Connector and then select S3 Tables under the Data Persistence category.
- On the New Connector page, configure the following information:
- Connector Name: The system will automatically generate a connector name..
- S3Tables ARN: Enter the Amazon Resource Name (ARN) of your S3 Table Bucket. You can find this in the Table buckets section in the AWS Console.
- Access Key ID and Secret Access Key: Enter the AWS access credentials associated with an IAM user or role that has permission to access S3 Tables and Athena.
- Enable TLS: Enable or disable TLS when connecting to S3 Tables. For detailed TLS connection options, see TLS for External Resource Access.
- Health Check Timeout: Specify the timeout duration for the connector to perform automatic health checks on its connection with S3 Tables.
- Use the default values for the remaining settings.
- Before clicking New, you can click Test to test if the connector can connect to the S3 Tables server.
- Click the New button at the bottom to complete the creation of the connector.
You have now completed the connector creation and will proceed to create a rule with action for specifying the data to be written into the S3 Tables service.
Create a Rule
This section demonstrates how to create a rule to process messages from the source MQTT topic t/# and write the processed results to the mybucket bucket in S3 Tables through the configured action.
Click New Rule in the Rules area or click the New Rule icon in the Actions column of the connector you just created.
Enter the following rule SQL in the SQL Editor:
TIP
Ensure that the output fields match the schema defined in your Iceberg table. If a required column is missing or misnamed, data may fail to append to the table.
sqlSELECT payload.str as c_str, payload.int as c_long FROM "t/#"TIP
If you are new to SQL, you can click SQL Examples and Enable Debug to learn and test the rule SQL results.
Click Next to add an action.
Select the connector you just created from the Connector dropdown box.
Configure the action settings:
- Namespace: The namespace where your table resides. If it includes multiple segments, use dot notation (e.g.,
my.name.space). - Table: The name of the Iceberg table to append data to (e.g.,
testtable). - Max Records: The maximum number of records to batch before writing to S3. Once reached, the batch is flushed and uploaded immediately.
- Time Interval: The maximum time (in milliseconds) to wait before flushing data, even if the record count has not reached the Max Records threshold.
- Namespace: The namespace where your table resides. If it includes multiple segments, use dot notation (e.g.,
Fallback Actions (Optional): If you want to improve reliability in case of message delivery failure, you can define one or more fallback actions. These actions will be triggered if the primary action fails to process a message. See Fallback Actions for more details.
Expand Advanced Settings and configure the advanced setting options as needed (optional).
Click the Confirm button to complete the rule configuration.
In the Successful new rule pop-up, click Back to Rules, thus completing the entire data integration configuration chain.
Test the Rule
This section shows how to test the rule configured with the S3 Tables action.
Use MQTTX to publish a message to the topic
t/1:bashmqttx pub -i emqx_c -t t/1 -m '{ "str": "hello S3 Tables", "int": 123 }'This message contains a
payload.strfield and apayload.intfield, which match the rule SQL and the table schema you defined earlier.Monitor rule metrics and action status in the Rules page. There should be one new incoming and one new outgoing message.
Open the Athena query editor. Ensure the correct Catalog (e.g.,
s3tablescatalog/mybucket) and Database (namespace) are selected.Run the following SQL query:
sqlSELECT * FROM testtableYou should see a row like:
c_str c_long hello S3 Tables 123