Connectors
Connectors give EMQX Agents controlled access to EMQX services and external systems. A connector stores the connection or authorization information for one service account, deployment, or workspace and makes selected capabilities available to chats and deployed agents.
Connectors are configured at the EMQX Agents deployment level and can be reused across multiple chats and agents.
How Connectors Work
The connector workflow has three stages:
- Add and authorize: Add a connector from the Available tab. Configure its connection fields or authorize access to an external service.
- Select for a chat: Select the connector in a chat so EMQX Agents can discover the relevant capabilities and use them while building the agent.
- Use at runtime: The generated agent definition references the connector and the tools required by the agent. After deployment, the agent uses the connector to perform those operations.
Adding a connector does not automatically give every chat or agent access to all of its tools. When you create an agent, EMQX Agents selects the connector tools required for the workflow. Only those tools are included in the generated agent definition.
Connector Types
EMQX Agents supports two connector groups.
EMQX Connectors
EMQX connectors connect agents to EMQX services by using connection parameters or API credentials.
| Connector | Capabilities |
|---|---|
| EMQX Broker | Subscribe to MQTT topics as event triggers and publish MQTT messages as actions. |
| EMQX Tables | Query and write time-series data through SQL. |
| EMQX Fleets | Work with the device registry, shadows, commands, jobs, groups, tags, and device searches. |
MCP Connectors
Model Context Protocol (MCP) connectors authorize external services and expose an approved set of service-specific tools to EMQX Agents.
| Connector | Capabilities |
|---|---|
| Databricks | Work with Unity Catalog, SQL warehouses and statements, jobs, model serving, and Vector Search. |
| Slack | Read and send messages, manage channels, upload files, add reactions, and create reminders. |
| Microsoft Teams | Work with chats, teams, channels, messages, meetings, and shifts. |
| Telegram | Use a Telegram bot to work with messages, files, locations, polls, chats, and bot commands. |
| Gmail | Read, search, send, reply to, and organize email and drafts. |
| Outlook | Work with Outlook email, folders, attachments, contacts, and calendar events. |
| Google Docs | Create, read, export, and edit Google documents. |
| Google Drive | Manage files, folders, permissions, comments, and shared drives. |
| Notion | Work with pages, databases, blocks, comments, and file uploads. |
| Google Tasks | Create and manage task lists and tasks. |
| Linear | Work with issues, projects, comments, teams, users, labels, and workflow states. |
| Supabase | Query database tables, run SQL, and invoke Edge Functions. |
View Connectors
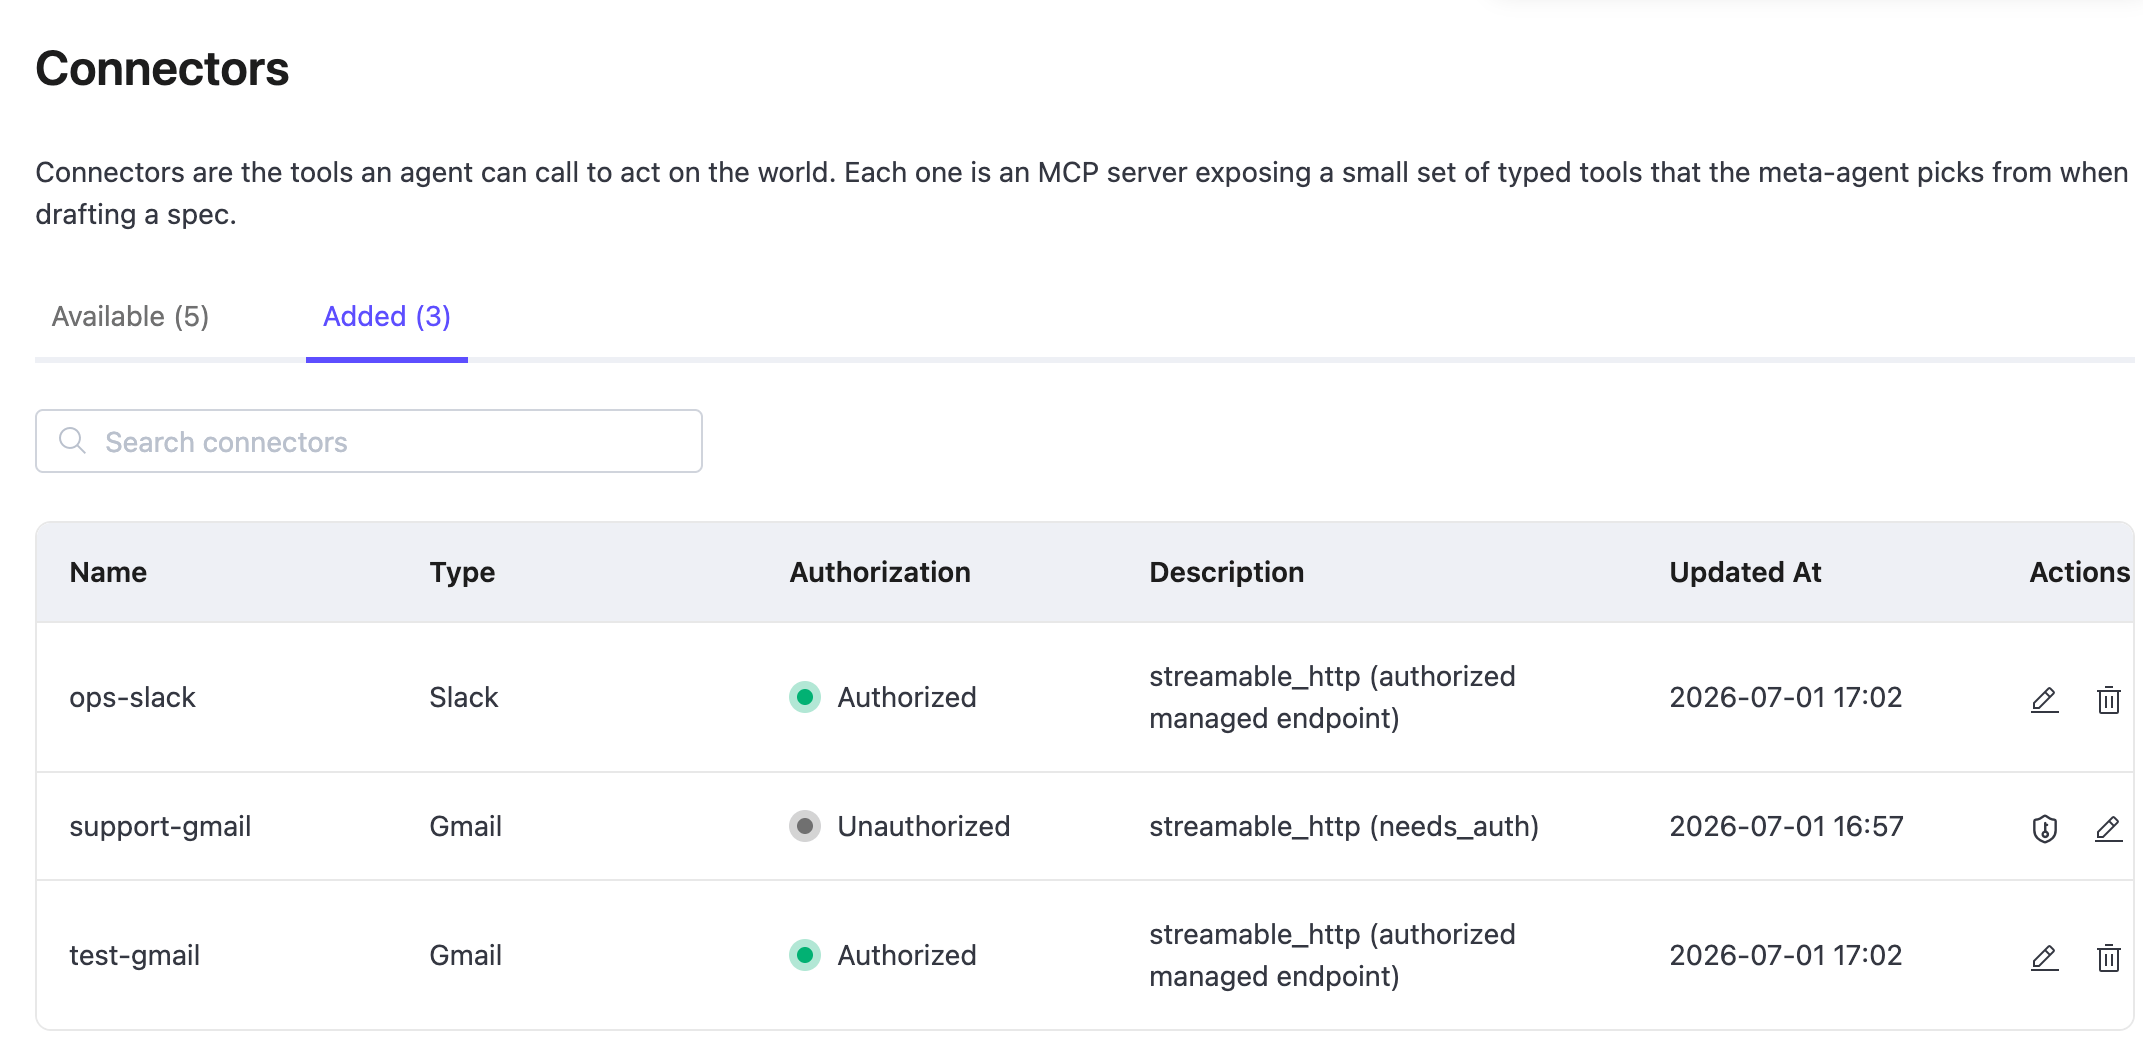
Click Connectors in the left navigation menu of your EMQX Agents deployment. The page contains two tabs:
- Available: Shows connector types that you can add. Use the search box to filter connector types.
- Added: Shows connector instances already added to the deployment. Use the search box to filter connectors by name.
The Added tab contains the following information:
| Column | Description |
|---|---|
| Name | The display name assigned to the connector. |
| Type | The connector type, such as EMQX Fleets, Gmail, or Slack. |
| Authorization | The authorization status. This column applies to MCP connectors. |
| Description | A summary of the connection. MCP connectors show transport and authorization details. |
| Updated At | When the connector was last modified. |
| Actions | Available management actions, such as editing, deleting, or retrying authorization. |
Add a Connector
- Click Connectors in the left navigation menu.
- On the Available tab, find the connector type that you want to add.
- Click Add on the connector card.
- Enter a connector name and configure the required connection fields, if applicable.
- Click Confirm.
- For an MCP connector, continue with Authorize an MCP Connector. For an EMQX connector, open the Added tab and verify that the connector is ready to use.
Authorize an MCP Connector
MCP connectors require authorization from the external service. After you enter a name and click Confirm, EMQX Agents adds the connector with the Unauthorized status and opens an authorization dialog.
Complete the following steps in the dialog:
- Follow the prompts displayed by Composio. Depending on the connector, sign in to the external service and authorize access, or enter the required connection information, such as a service URL and access token.
- Select the account, workspace, project, or other resource that the connector should access, if prompted.
- Review the permissions requested by the integration, if shown.
- Click the authorization or connection button shown for the service.
- Wait for Composio to confirm the connection and return you to EMQX Agents.
- On the Added tab, verify that an Authorization successful message appears and that the connector status is Authorized.
The exact connection information, sign-in, resource selection, and approval steps depend on the external service. See the connector-specific page for details.
For connector-specific prerequisites and configuration, select a connector from Connector Types.
MCP Connector Authorization Statuses
MCP connectors use the following authorization statuses:
| Status | Description | Action |
|---|---|---|
| Unauthorized | Authorization has not been completed, or the authorization flow ended before completion. | Retry authorization from the Actions column. |
| Authorized | Authorization succeeded, and the connector can provide tools to chats and agents. | No action is required. |
| Expired | The external service authorization expired. | Reauthorize the connector from the Actions column. |
| Error | Authorization failed, or EMQX Agents cannot verify the authorization state. | Retry authorization. If the error remains, check the external service account and permissions. |
Connectors in Unauthorized, Expired, or Error status can appear in the chat connector panel but cannot be selected.
Use Connectors in a Chat
- Click the connector icon in the lower-left corner of the chat input area.
- In the Connectors panel, select the authorized connectors required for the workflow.
- To add another connector without leaving the chat, click + in the upper-right corner of the panel.
- Describe the required external operations in the chat prompt.
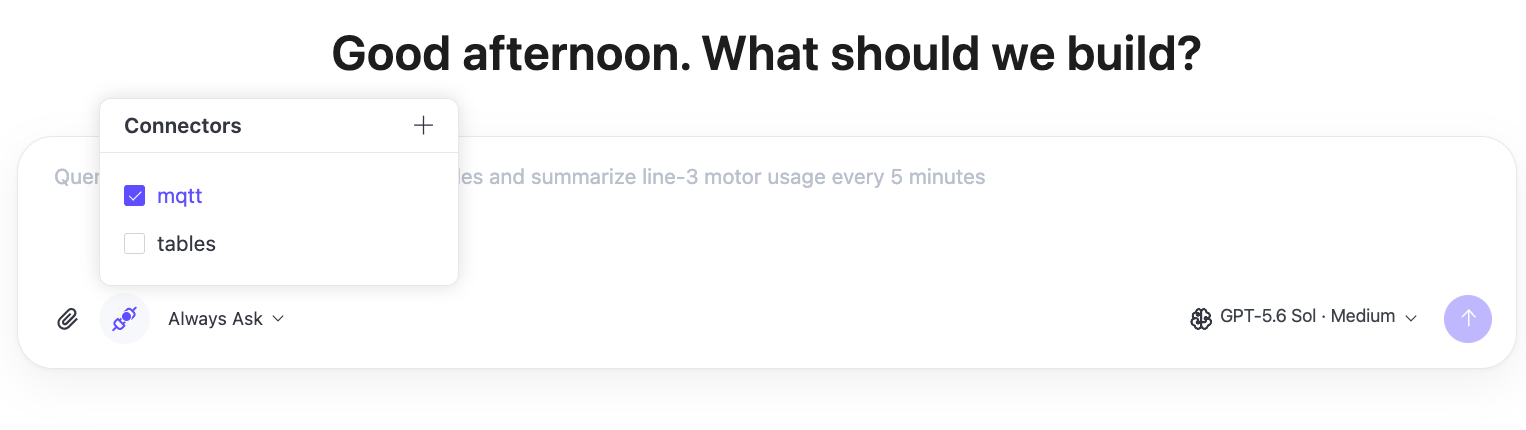
EMQX Agents uses the selected connectors to configure triggers and tools in the generated agent definition. For example, an EMQX Broker connector can provide an MQTT event trigger and an MQTT publish action. A Slack connector can provide selected messaging tools.
Example Workflows
The following examples show how connectors can be combined when creating an agent. Replace the example topic, table, and channel names with resources from your environment.
| Workflow | Connectors | Example Prompt | Expected Result |
|---|---|---|---|
| MQTT alert notification | EMQX Broker and Slack | Create an agent that monitors factory/+/alerts and posts critical alerts to the #operations Slack channel. | The generated agent uses matching MQTT messages as triggers and sends critical alerts to Slack. |
| Device incident investigation | EMQX Fleets and Microsoft Teams | Create an agent that reads a device's registry and shadow information, then posts an incident summary to the Device Operations Teams channel. | The generated agent retrieves device information from EMQX Fleets and shares the summary in Microsoft Teams. |
| Time-series data analysis | EMQX Tables | Create an agent that queries device telemetry from the device_metrics table and summarizes abnormal values. | The generated agent uses the required SQL query tool to retrieve and summarize telemetry data. |
Security and Permissions
Apply the following practices when using connectors:
- Use accounts and credentials with the minimum permissions required by the agent.
- Select only the connectors required for the current chat or agent.
- Before deploying an agent, review the tools included in its generated definition. Pay particular attention to tools that send messages, modify or delete data, execute SQL, or cancel operations.
- Manage access to private channels, documents, databases, and other external resources in the external service.
- Do not include passwords, API keys, access tokens, or other sensitive connection details in chat prompts or agent instructions.
Sensitive connector configuration fields are masked in public API responses. Connector credentials are managed separately from the generated agent definition, which references the connector without including its credential values.
At runtime, only connectors referenced by the deployed definition are made available to the agent. For managed MCP connectors, the underlying external service credentials are managed by the authorization provider and are not stored in EMQX Agents.
Tool executions are recorded as run events with sanitized arguments and results, execution status, and duration.
External services can apply their own API quotas, rate limits, file limits, and plan restrictions. See the connector-specific page for known limitations.
Edit a Connector
- On the Added tab, click the edit icon for the connector.
- Update the editable fields for the connector type.
- Click Confirm.
The editable fields for EMQX connectors depend on the connector type. See the connector-specific instructions for EMQX Broker, EMQX Tables, and EMQX Fleets.
For all MCP connectors, only Name can be edited. Type and the external service authorization cannot be changed in the Edit Connector panel.
Important Notice
If a connector is used by a deployed agent, edit only Name. Do not change its address, credentials, or other connection settings, even if those fields are currently enabled in the Edit Connector panel.
Delete a Connector
- On the Added tab, click the delete icon for the connector.
- In the Tips dialog, click Confirm.
Important Notice
A connector used by a deployed agent cannot be deleted. Remove the connector from all deployed agents before deleting it.
Troubleshooting
| Symptom | Possible Cause | Resolution |
|---|---|---|
| An MCP connector cannot be selected in a chat. | The connector is not authorized, or its authorization expired. | Open the Added tab and complete or retry authorization. |
| The external service returns a permission error. | The authorized account cannot access the requested resource or operation. | Grant the required permission in the external service or use a connector authorized with an appropriate account. |
| A tool does not appear in the generated agent. | The connector was not selected, the tool is not approved for the integration, or the agent does not require the tool. | Select the connector and describe the required operation explicitly in the chat. |
| A deployed agent fails after a connector update. | The updated credentials, address, or authorization is invalid. | Test or reauthorize the connector, then run the agent again. |
| The external service rejects requests intermittently. | The service applied a rate limit, quota, or plan restriction. | Check the external service status and account limits, then retry later. |
Use Connectors with a Template
When you click Use Template on a template detail page, the Use Template panel lists the connector types required by the template. Select the configured connectors that the new chat and workspace should use.
If you customize the template instructions, the required connectors can change with the requested behavior. The Builder does not continue to require a connector that is no longer needed. If the customized behavior requires a connector that has not been selected or configured, the Builder asks you to provide it in the chat. The Builder does not invent connector IDs or bypass connector authorization requirements.
For the complete template workflow, see Use EMQX Agents Templates.