Manage an EMQX Fleets Deployment
This page describes the management operations available for an EMQX Fleets deployment, including monitoring the deployment overview, checking dependent services, managing Fleets TLS/SSL, managing API keys, and configuring deployment settings.
Deployment Overview
The Deployment Overview page is the main dashboard for a Fleets deployment. It shows the deployment's device statistics, deployment metadata, dependent services, Fleets TLS/SSL information, and API keys.

Device Statistics and Deployment Info
| Metric | Description |
|---|---|
| Thing Types | Total number of Thing Types defined in this deployment |
| Things | Total number of registered devices |
| Things Online / Offline | Current online and offline device counts |
| Status | Deployment status: Running or Stopped |
| Region | The region and cloud provider where the deployment is running |
| Created At | Deployment creation timestamp |
Dependent Services
The Dependent services section shows the EMQX Broker and EMQX Tables deployments attached to the Fleets deployment. Fleets depends on these services for MQTT device connectivity and time-series data storage.
Each service card shows:
| Field | Description |
|---|---|
| Service Type | The dependent service type, such as Broker or Tables |
| Deployment Name | The name of the attached Broker or Tables deployment |
| Health Status | The current health status of the dependent service |
| Service Endpoint | The internal service endpoint used by Fleets to connect to the service |
Click the refresh icon in this section to update the displayed service status.
Fleets TLS/SSL
Fleets TLS/SSL secures MQTT connections between devices and the Broker attached to your Fleets deployment. It also provides the certificate basis for certificate-based device authentication. The Fleets TLS/SSL section shows the TLS/SSL certificates associated with the Fleets deployment.
Fleets TLS/SSL is synced to the attached Broker and shown as Fleets-managed on the Broker TLS/SSL page. If the attached Broker already has a TLS/SSL configuration, creating a Fleets TLS/SSL configuration takes over the Broker TLS/SSL configuration. After that, the Broker TLS/SSL configuration is read-only on the Broker page and must be managed from the Fleets deployment.
The certificate list includes:
| Field | Description |
|---|---|
| Expire At | Certificate expiration time |
| Common Name | Certificate Common Name |
| TLS/SSL Type | The TLS/SSL authentication type |
| Status | Certificate status |
| Source | Certificate source |
Fleets uses the existing TLS/SSL expiration alert mechanism to remind you before the server TLS certificate or the client certificate issuing CA expires.
Available operations depend on the TLS/SSL status. When the status is Running, you can replace or delete the configuration. When it is Pending, certificate operations are temporarily unavailable. When it is Failed, you cannot delete or recreate the TLS/SSL configuration in the Console. Contact the EMQX team by submitting a support ticket for assistance.
Create a Fleets TLS/SSL Configuration
- On the Deployment Overview page, go to the Fleets TLS/SSL section.
- Click + Create TLS/SSL.
- Select the TLS/SSL Type:
- one-way: Clients verify the server certificate.
- two-way: Clients and the server verify each other's certificates. Use this type if you want to enable certificate-based device authentication.
- Enter or upload the required PEM-encoded certificate files:
- Certificate and Certificate Chain: The server certificate and certificate chain.
- Certificate Private Key: The private key that matches the server certificate.
- Client CA Certificate: Required for two-way TLS/SSL. This CA is used for issuing and verifying client certificates.
- Client CA Private Key: Required for two-way TLS/SSL. This key is used with the Client CA Certificate to issue client certificates.
- Click Confirm.
TIP
Private keys are used only for certificate configuration. They are not displayed or available for download after submission.
Replace a Fleets TLS/SSL Configuration
To replace the current Fleets TLS/SSL configuration, edit it from the Fleets TLS/SSL section and submit a complete certificate group again. Fleets does not support editing a single certificate field independently.
The TLS/SSL type cannot be changed during replacement. To switch between one-way and two-way TLS/SSL, delete the existing configuration first, and then create a new one with the required type.
Replacing Fleets TLS/SSL also updates the Fleets-managed TLS/SSL configuration on the attached Broker.
Delete a Fleets TLS/SSL Configuration
Deleting Fleets TLS/SSL removes the Fleets-managed TLS/SSL configuration from both the Fleets deployment and the attached Broker, and restores TLS/SSL management on the Broker side.
Important Notice
Deleting Fleets TLS/SSL can interrupt devices that connect through TLS/SSL or certificate authentication. If certificate-based device authentication is enabled, switch Device Authentication away from Certificate before deleting the TLS/SSL configuration.
If a Fleets deployment is deleted while it manages the attached Broker's TLS/SSL configuration, the Fleets-managed TLS/SSL configuration is also removed from the Broker.
Deployment API Keys
API keys allow programmatic access to the Fleets REST API. Each key has its own set of API permissions, scoped to specific endpoints and HTTP methods.
For the complete API reference, see EMQX Fleets API.
The API Endpoint for this deployment is shown at the top of the Deployment API Key section on the Deployment Overview page. Use this URL as the base URL for all Fleets REST API calls:
https://{deploymentId}.ala.gcp.fleets.mqttce.net:8443Authenticate all API requests with Basic Auth using the API key and secret:
Authorization: Basic <base64(apiKey:apiSecret)>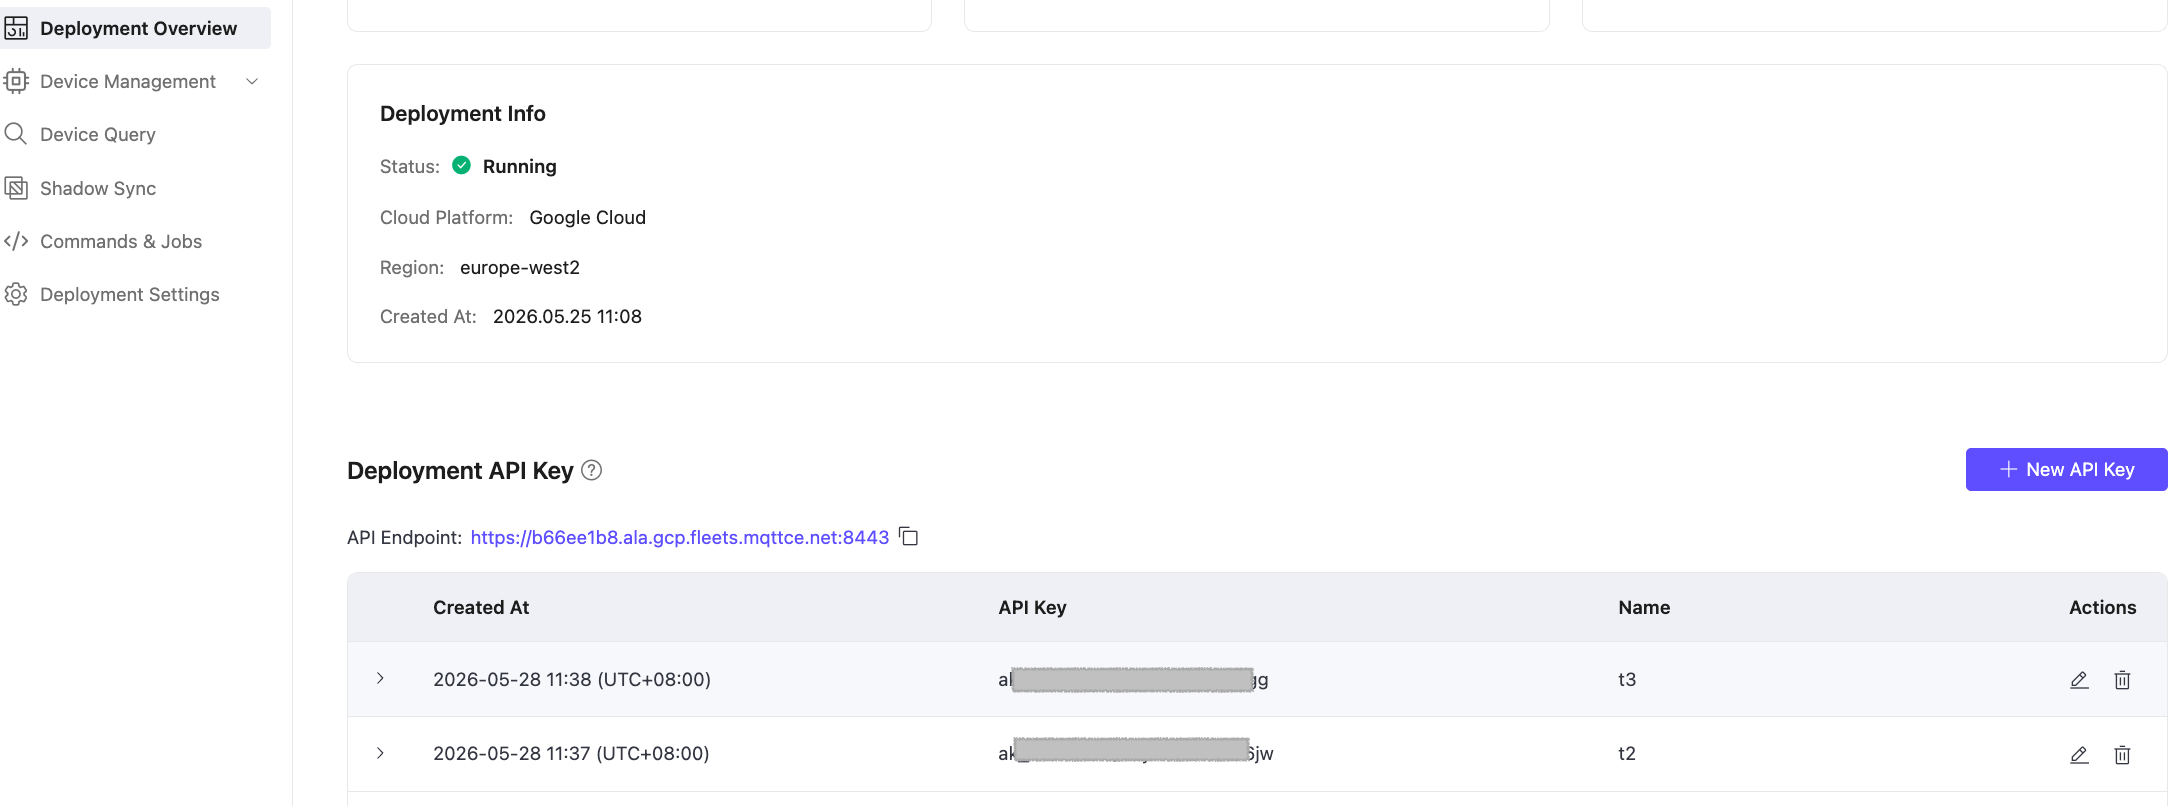
Create an API Key
On the Deployment Overview page, go to the Deployment API Key section.
Click + New API Key.
Enter a Name for the key.
Under API Permissions, select the endpoints and HTTP methods this key is allowed to access. Use the method buttons (GET, POST, PUT, PATCH, DELETE) to filter by method, or use the search box to filter by path prefix.
Grant only the permissions the key actually needs. For example, a key used by a device to report data only needs
POST /api/v1/thing-datas; a key used for read-only monitoring only needsGETaccess to/api/v1/thingsand/api/v1/thing-types. Use Select All only for administrative or testing purposes.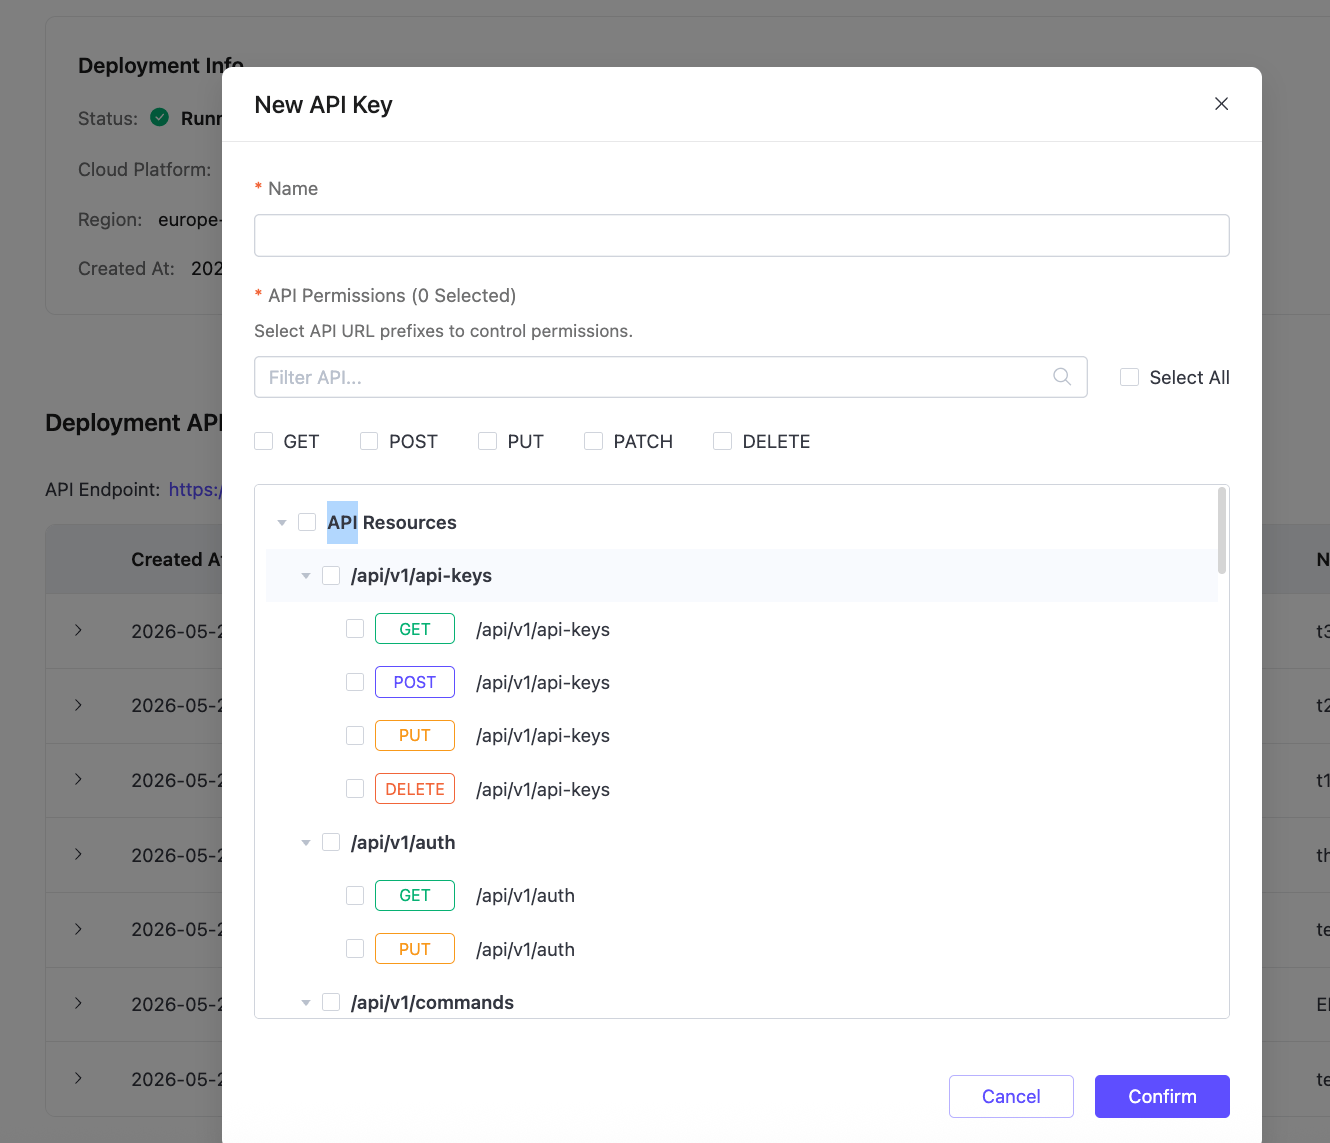
Click Confirm. A dialog displays the generated API Key and API Secret.
TIP
The API Secret is shown only once at creation. Store it securely. It cannot be retrieved later.
Click Close.
Manage API Keys
- View permissions: Click the expand arrow to the left of a key to see its assigned API Permissions, grouped by resource path.
- Edit: Click the edit icon in the Actions column to update the Name or modify the API Permissions.
- Delete: Click the delete icon in the Actions column to revoke access immediately.
Important Notice
Deleting an API key used by a running application or device will immediately break those integrations. Verify that the key is no longer in use before deleting it.
Deployment Settings
The Deployment Settings page shows the deployment's configuration details.
| Field | Description |
|---|---|
| Deployment Name | Editable. Click the edit icon to rename. |
| Deployment ID | Unique identifier for this deployment. Used in API calls and support requests. |
| Plan | Current plan (for example, Starter). |
| Network ID | The network identifier for this deployment. |
| Cloud Platform | Cloud provider (read-only). |
| Region | Deployment region (read-only). |
| Billing Method | Current billing method (for example, Pay as you go). |
Rename a Deployment
- Go to Deployment Settings.
- Click the edit icon next to Deployment Name.
- Enter the new name and confirm.
Configure Device Authentication
The Device Authentication section controls how devices authenticate when connecting through the attached Broker.
Available authentication modes are:
| Mode | Description |
|---|---|
| Password | Devices authenticate with username and password credentials configured for the Broker. |
| Certificate | Devices authenticate with client certificates. This mode requires a running two-way Fleets TLS/SSL configuration. |
To enable certificate authentication, first create a two-way Fleets TLS/SSL configuration and wait until its status is Running. Then go to Deployment Settings, select Certificate under Device Authentication, and click Apply.
Delete a Deployment
To delete a Fleets deployment, go to Deployment Settings and click Delete Deployment.
Important Notice
Deleting a Fleets deployment is permanent and cannot be undone. It removes the Fleets deployment and its device management data. If the Fleets deployment manages the attached Broker's TLS/SSL configuration, the Fleets-managed TLS/SSL configuration is also removed from the Broker.