Message History
Message History lets you store selected fields from MQTT messages in EMQX Tables. Create a mapping to choose an MQTT topic filter, a target table, the fields to store, and the timestamp for each record.
With Message History, you can:
- Set up MQTT data storage without manually building a data integration pipeline.
- Preview recent records and check delivery metrics from the Broker deployment.
- Retain telemetry in EMQX Tables for SQL queries and trend analysis.
- Enable, disable, or delete individual mappings without deleting data already stored in EMQX Tables.
Message History is available only on the international site for Dedicated and Dedicated Flex deployments running EMQX v6.1.4 or later.
When to Use Message History
Use Message History when you want to continuously store selected fields from MQTT messages in EMQX Tables. It is well suited to telemetry with a consistent structure, such as device measurements, status reports, and environmental readings.
Message History or Data Integration
Message History is a guided workflow built on the connector, rule, and action model used by Data Integration with EMQX Tables. It writes directly to the selected EMQX Tables table and does not maintain a separate message store. When you create a mapping, Message History creates or reuses an EMQX Tables connector and creates a managed data integration rule and EMQX Tables action. Multiple mappings can reuse the same connector.
Choose between Message History and Data Integration based on the level of control you need:
| Consideration | Message History | Data Integration |
|---|---|---|
| Setup | Choose the MQTT topic, target table, field mapping, and timestamp settings through a guided workflow. | Create and configure the connector, rule, and action separately. |
| Message processing | Select payload fields and MQTT metadata and assign Tag, Field, and timestamp roles. | Use custom Rule SQL, transformations, placeholders, and Form or Line Protocol configuration. |
| Destinations | Write to EMQX Tables through one managed action for each mapping. | Add multiple actions or send processed data to EMQX Tables and other supported systems. |
| Data verification | Preview recent records and delivery metrics from the Broker deployment. | Monitor the connector, rule, and action separately, and query stored data from EMQX Tables. |
| Resource management | Manage the pipeline as a mapping. You can edit rule and action settings in Data Integration, but the connector and mapping lifecycle remain managed by Message History. | Manage the connector, rule, and action independently. |
| Availability and networking | Use with an eligible Dedicated or Dedicated Flex deployment and an EMQX Tables deployment in the same network. | Use when Message History is unavailable for your deployment or network setup, subject to EMQX Tables connector support. |
Choose Message History for straightforward telemetry retention and a simplified operational experience. Choose Data Integration when you need advanced processing, multiple destinations, or independent control over integration resources. You can edit the rule and action created by Message History through Data Integration when you need more control, subject to the editing restrictions.
Message History stores only messages received while a mapping is enabled. It does not backfill earlier MQTT traffic or replay stored messages to subscribers. Matching messages consume data integration TPS, and Message History connectors count toward the Broker's connector limit. Check your deployment's data integration TPS capacity before creating a mapping.
To investigate client connection, authentication, or subscription events, use Event History. To run broader queries against data stored in EMQX Tables, use Data Explorer.
Before You Start
- Make sure that the Broker deployment is running and that you have permission to configure it.
- Prepare a running EMQX Tables deployment in the same network as the Broker. Tables deployments reached through a NAT Gateway or PrivateLink from another network are not eligible. If no eligible Tables deployment exists, Message History provides a New EMQX Tables entry to create one in the Broker's project, platform, region, and network.
- Prepare an EMQX Tables database and a user that has access to it. The user must have the
SqlSelectandSqlInsertprivileges; the Broker Integration preset grants both. Have the user's password ready. See Manage EMQX Tables Users.
Store Sensor Readings in EMQX Tables
In this example, devices publish temperature and humidity readings to topics such as sensors/sensor-001/telemetry. The mapping stores readings from all sensors in the sensor_history table in the public database. It uses the Broker received time for the timestamp column, so the payload does not need a timestamp.
Create the Mapping
In the Cloud Console, open the Broker deployment and select Message History in the left menu. Click Map a Topic to a Table if this is the first mapping, or New Mapping if mappings already exist.
Under Storage Location, select the EMQX Tables deployment, the
publicdatabase, and the Tables user. Enter the user's password. Leave Time-To-Live (TTL) at30 daysand the timestamp column name attimestamp. Click Next to test a new connection or reuse an existing one. Testing the connection does not create it.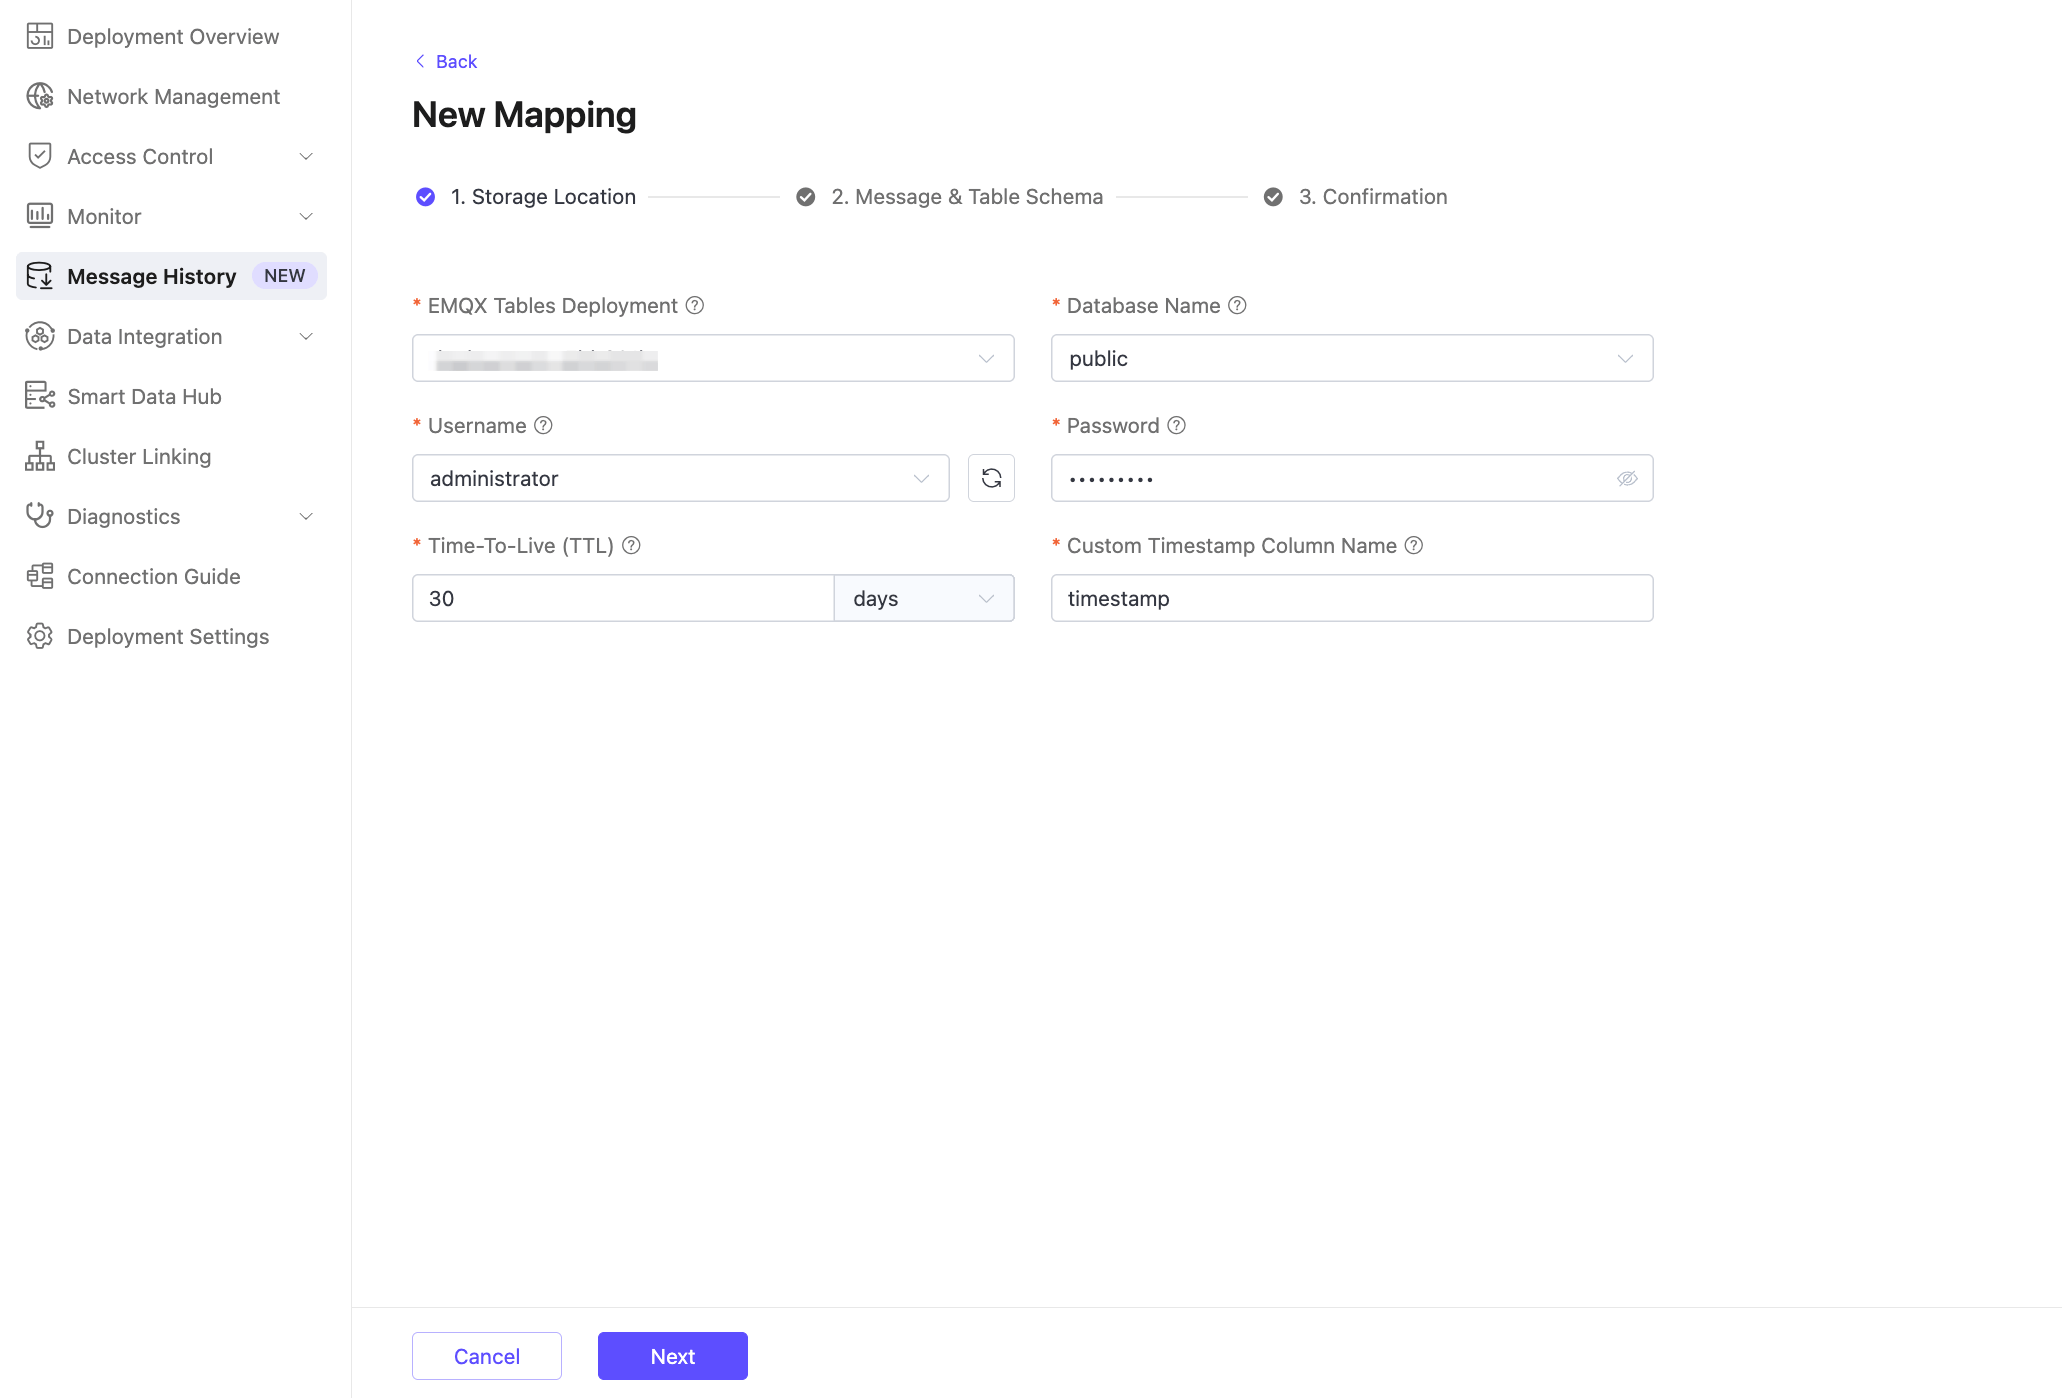
Under Message & Table Schema, enter
sensors/+/telemetryfor MQTT Topic andsensor_historyfor Table Name. The+wildcard matches one topic level, so this filter includes readings from different sensor IDs.Replace the MQTT Message Example with this payload:
json{ "device_id": "sensor-001", "temperature": 23.5, "humidity": 58.5 }In Field Mapping, set
payload.device_idto the Tag role. Keeppayload.temperatureandpayload.humidityas Field columns. Leave their target column names asdevice_id,temperature, andhumidity.TIP
At least one Field column is required. The names of all Tag, Field, and timestamp columns must be unique.
Keep Timestamp Column set to
Broker Received Timeand Time Precision set toMilliseconds (ms). Click Next.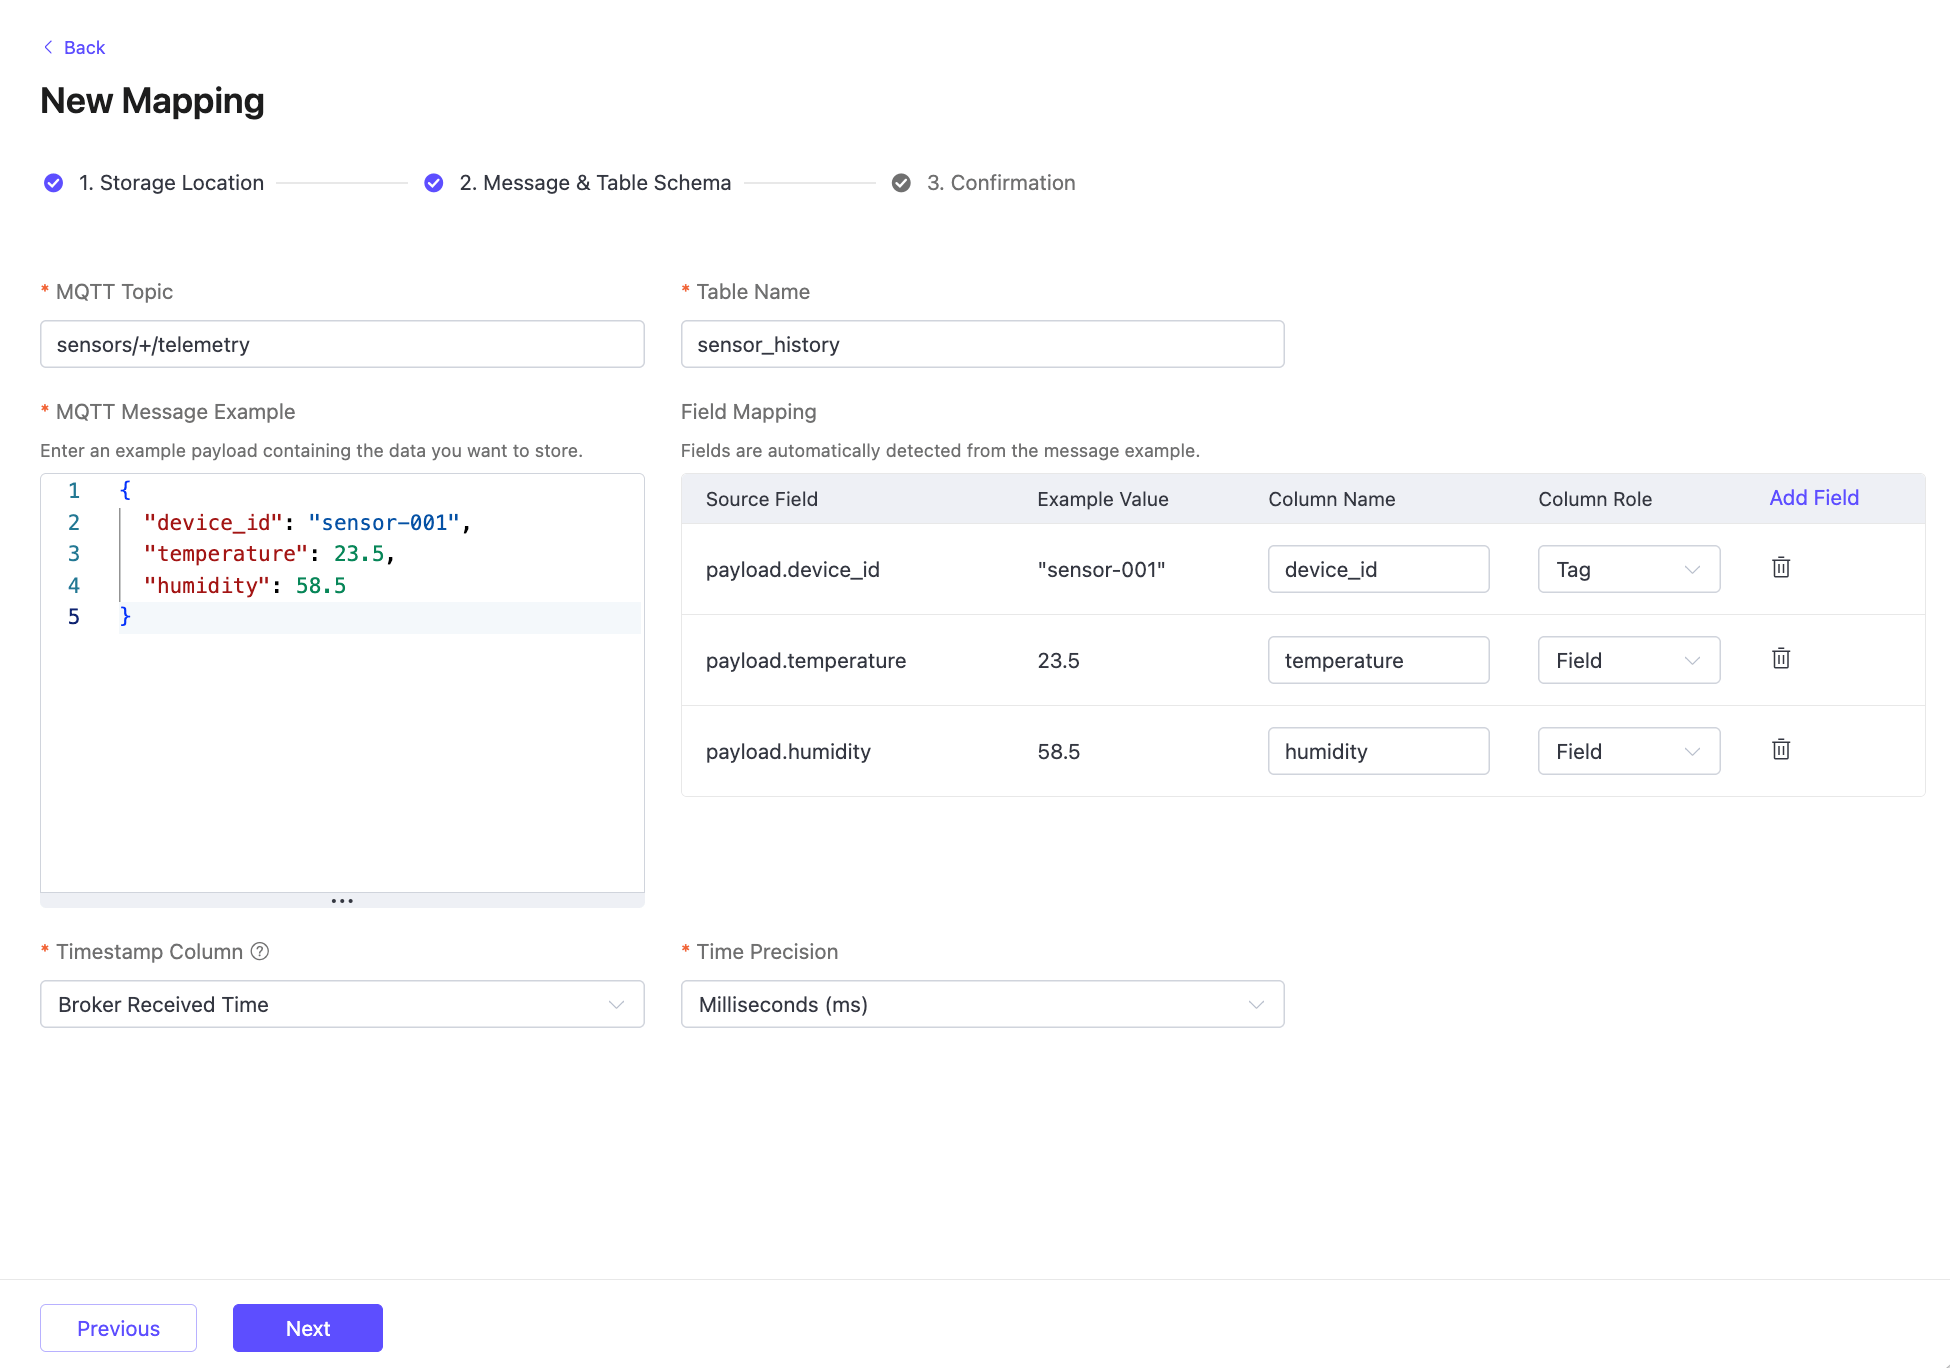
Review the destination, topic, and schema preview, then click Confirm. Message History creates the connector if needed, followed by the data integration rule and EMQX Tables action. The mapping then appears in the Message History list.
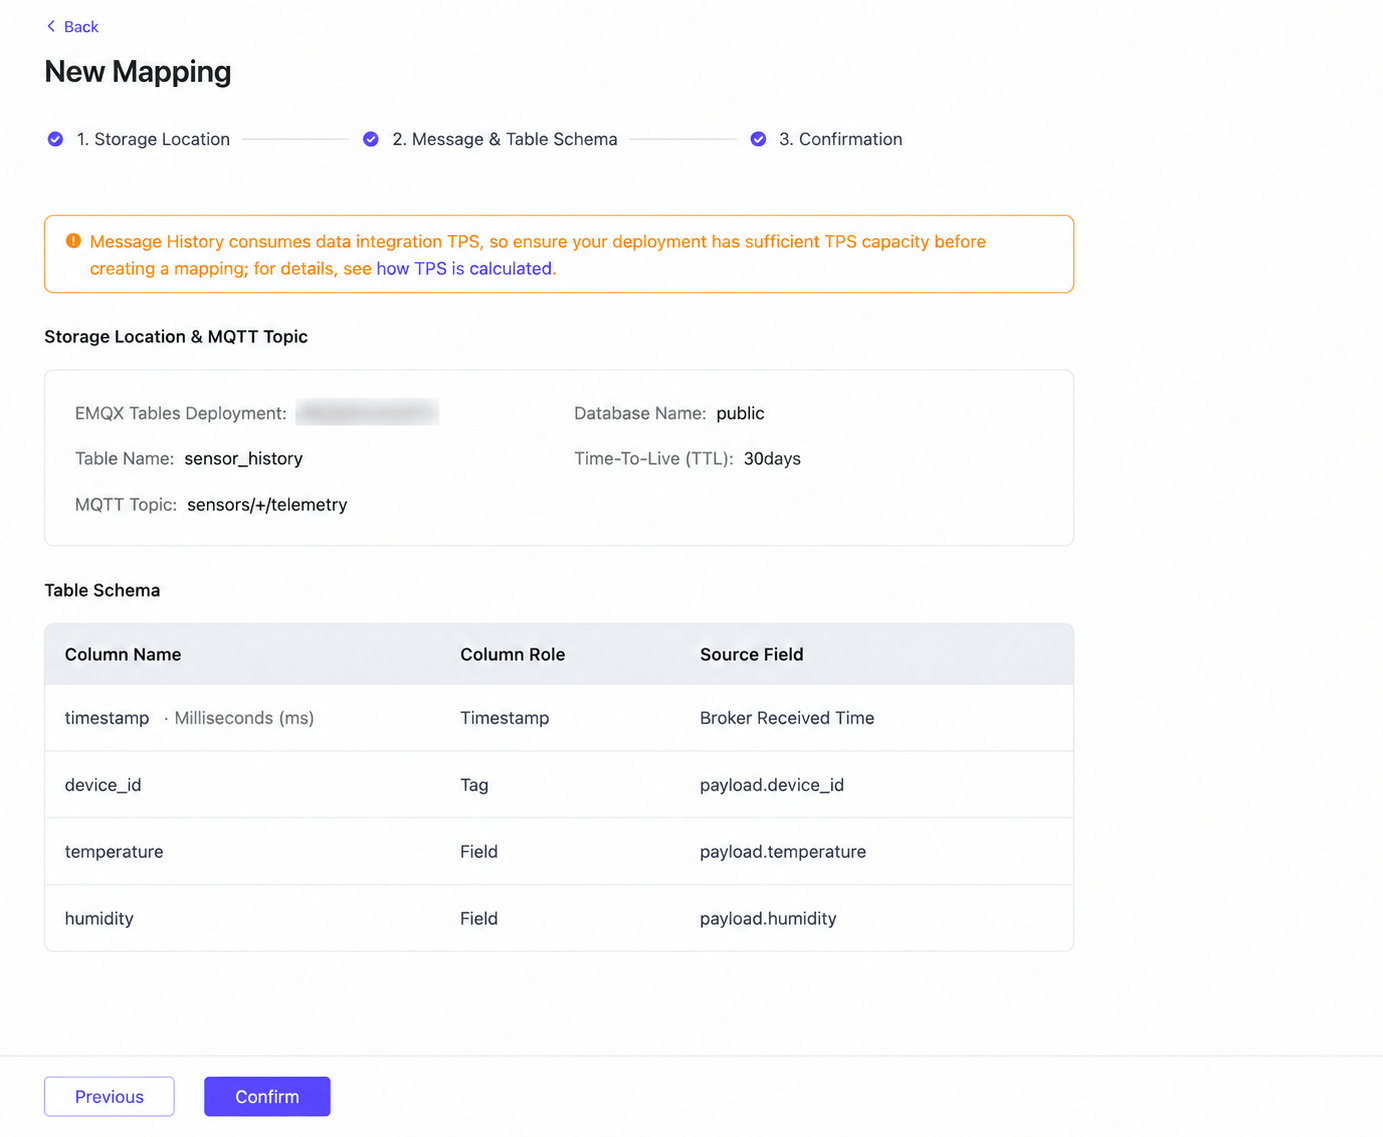
The schema preview does not create the table or write a record. If the target table does not exist, the first successful write creates it with the selected TTL and timestamp column name. If connector creation succeeds but mapping creation fails, the connector is retained and reused when you retry. The retained connector continues to count toward the Broker's connector limit.
Publish and Verify a Message
In the Broker deployment, open Diagnostics -> MQTT Client, connect, and publish the example payload to
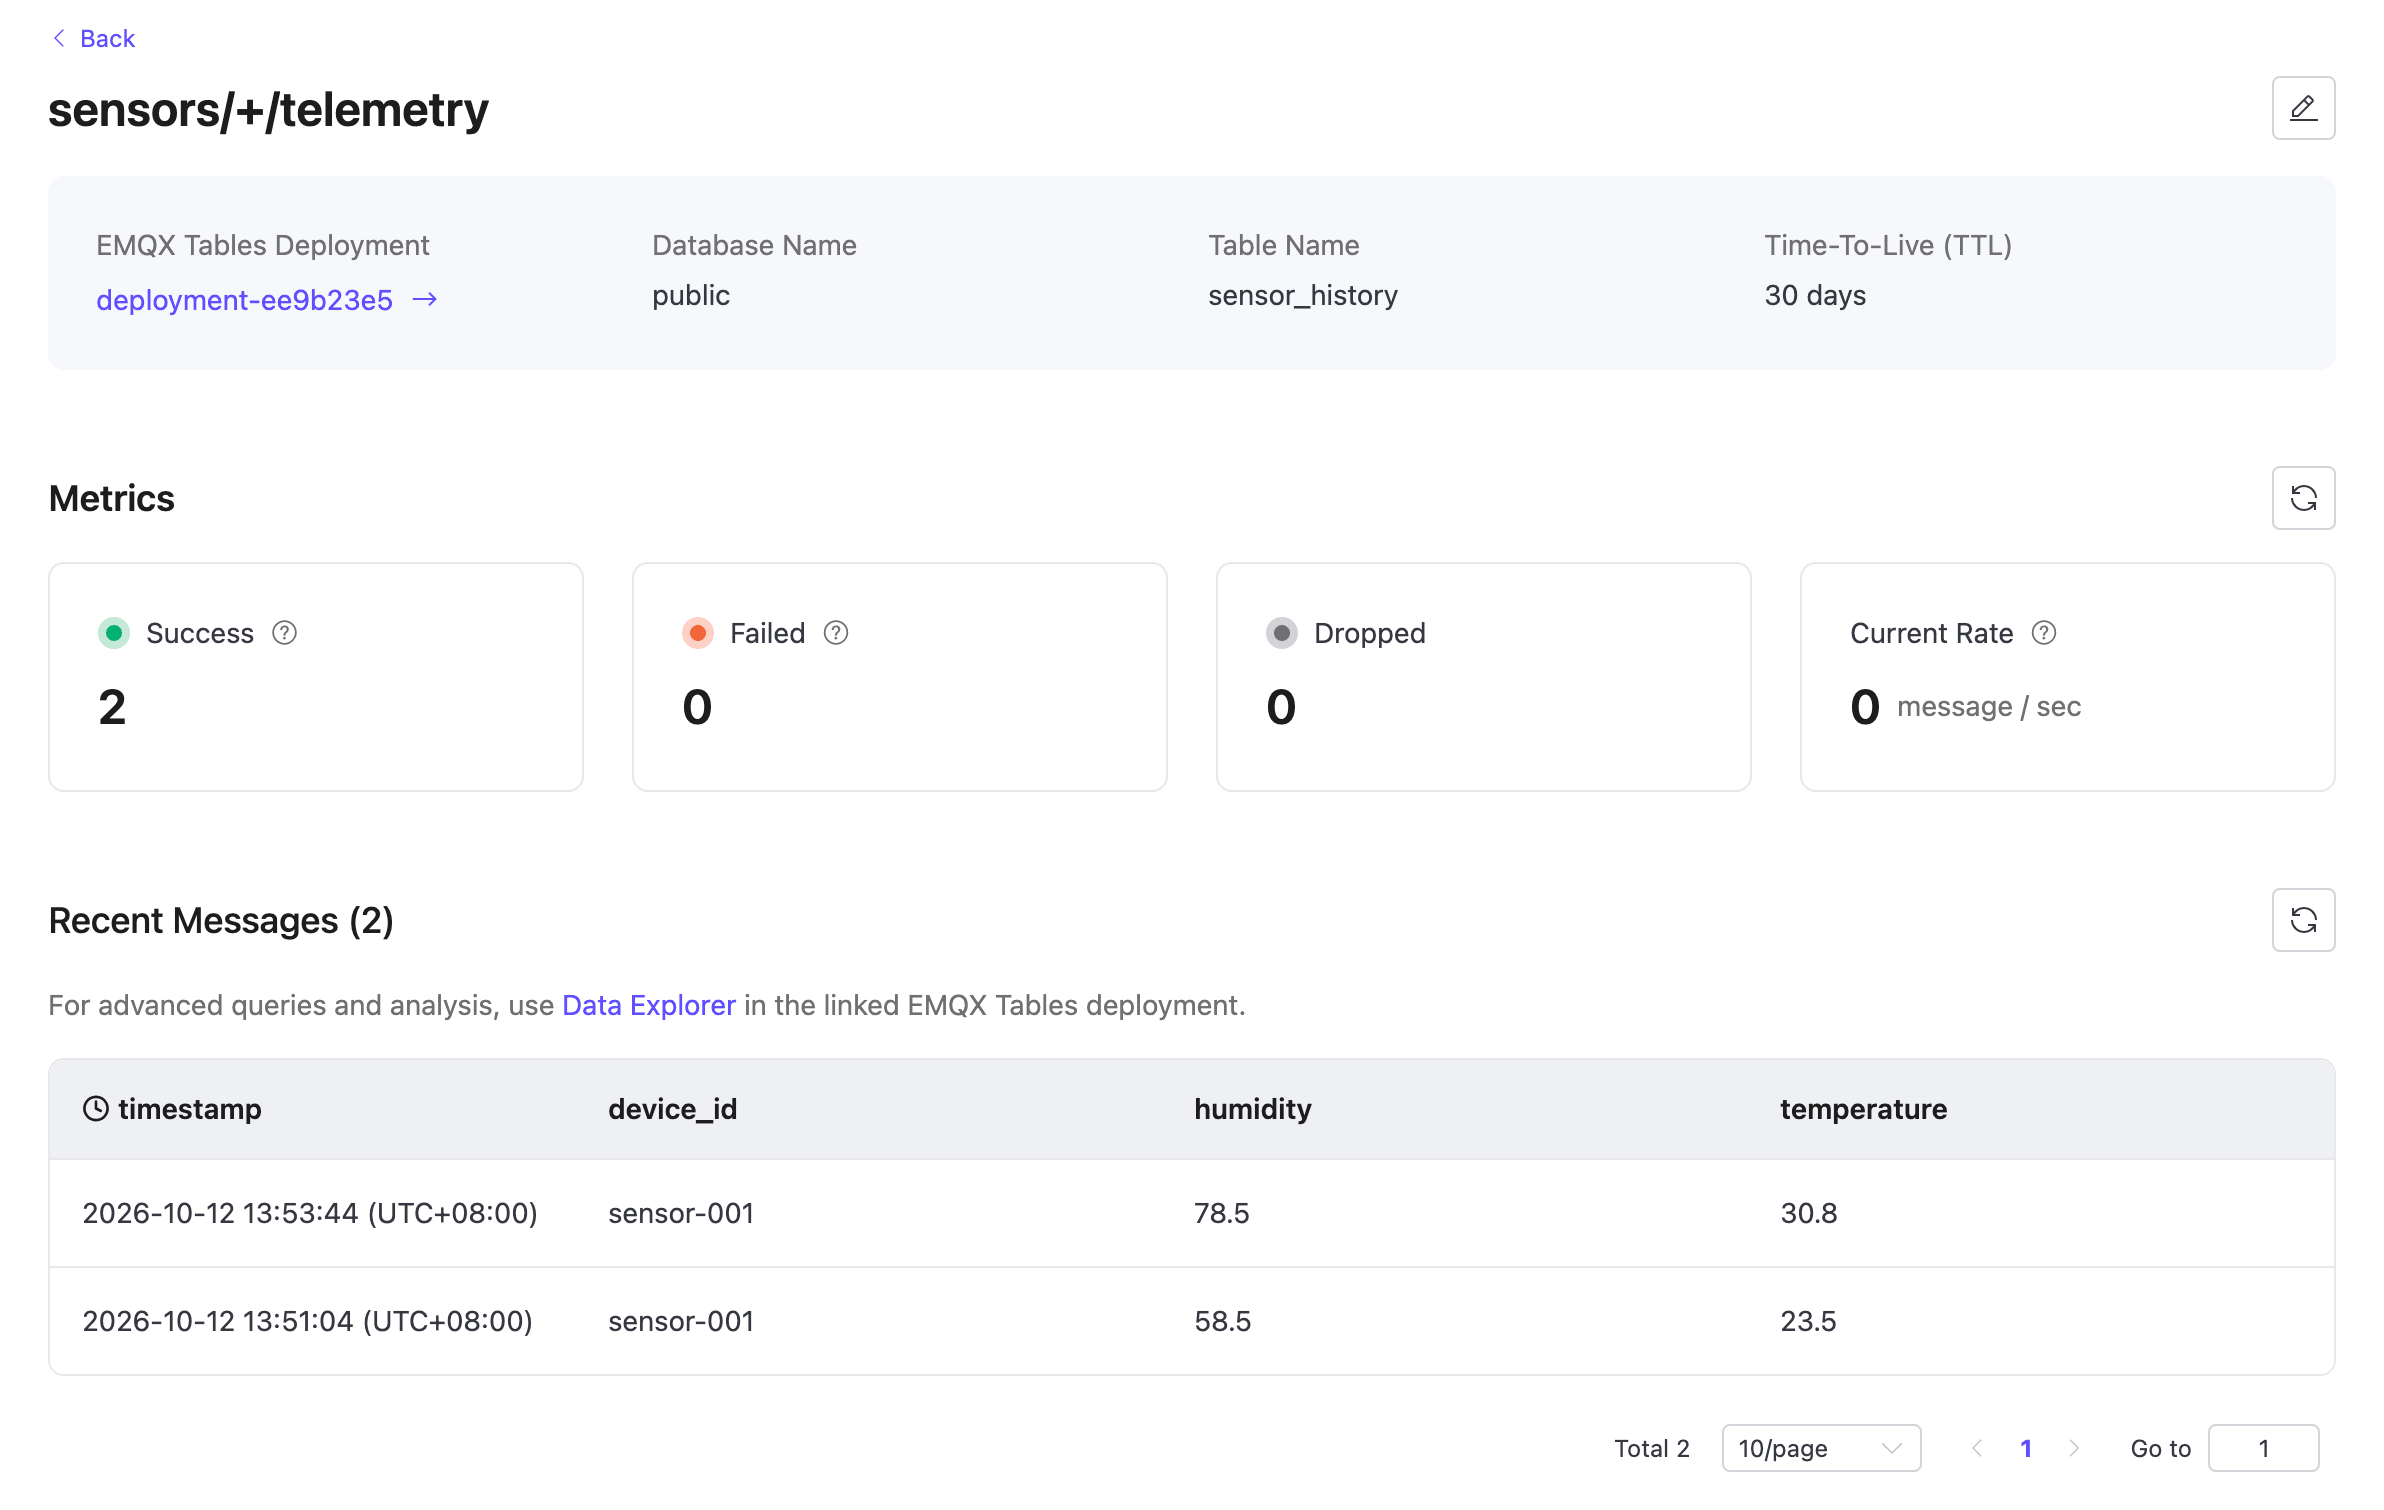
sensors/sensor-001/telemetry.Return to Message History and expand the mapping row to preview recent records. Click the mapping ID to open its details and check the delivery metrics.
Open Data Explorer in the linked EMQX Tables deployment, select the
publicdatabase, and run:sqlSELECT * FROM sensor_history ORDER BY "timestamp" DESC LIMIT 10;
The query should return a row for sensor-001 with the published temperature and humidity. For more examples, see Query Stored Messages.
Configure Message Formats and Field Mappings
- Topic filters: Use MQTT
+and#wildcards to capture multiple topics. A mapping stores only messages received while it is enabled. - Message examples: The Console detects fields and nested paths in a JSON object. Plain text produces one
payloadfield, and a top-level array can be stored as a single String Field. The completepayloadcannot be a Tag or Timestamp, and nested arrays cannot be mapped individually. The example defines the columns; it does not sample messages received by the Broker. - Additional fields: Use Add Field to map MQTT metadata such as
clientid,topic,qos,username, orpeername. Choose Tag for text values that you use to filter or group records and Field for measured values. Numeric values cannot be Tags. Keep at least one Field column. - Column names: Names for Tag, Field, and timestamp columns must all be unique.
- Message time: To store when a device produced a reading, add a Unix timestamp or an RFC 3339 date-time string such as
2026-09-23T08:00:00Zto the example payload, then select that field under Timestamp Column. For a Unix timestamp, set Time Precision to match its unit. Otherwise, use Broker Received Time. - Existing connectors: If a Message History connector is already configured for the selected Tables deployment, database, and user, the Console reuses it. Its TTL and timestamp column name are read-only in the wizard. Those settings affect only tables first created through that connector; check the settings of any existing target table separately.
For guidance on planning tables, selecting column roles, choosing timestamps, and handling payload changes, see Design and Query Message History Data.
View and Manage Mappings
The Message History list shows each mapping's ID, MQTT topic, database, table, and enabled state. Mappings are ordered by their most recent modification time.
- Expand a mapping row to preview up to 10 recent records.
- Click the mapping ID to view its destination, TTL, delivery metrics, and up to 100 recent records.
- Refresh the preview to load the latest records.
- Use Data Explorer for broader queries.
Message History queries EMQX Tables for each preview and orders the results by the timestamp column. Time columns show local time with the UTC offset; click the heading to switch to the raw timestamp. Hover over truncated values to view the full content.
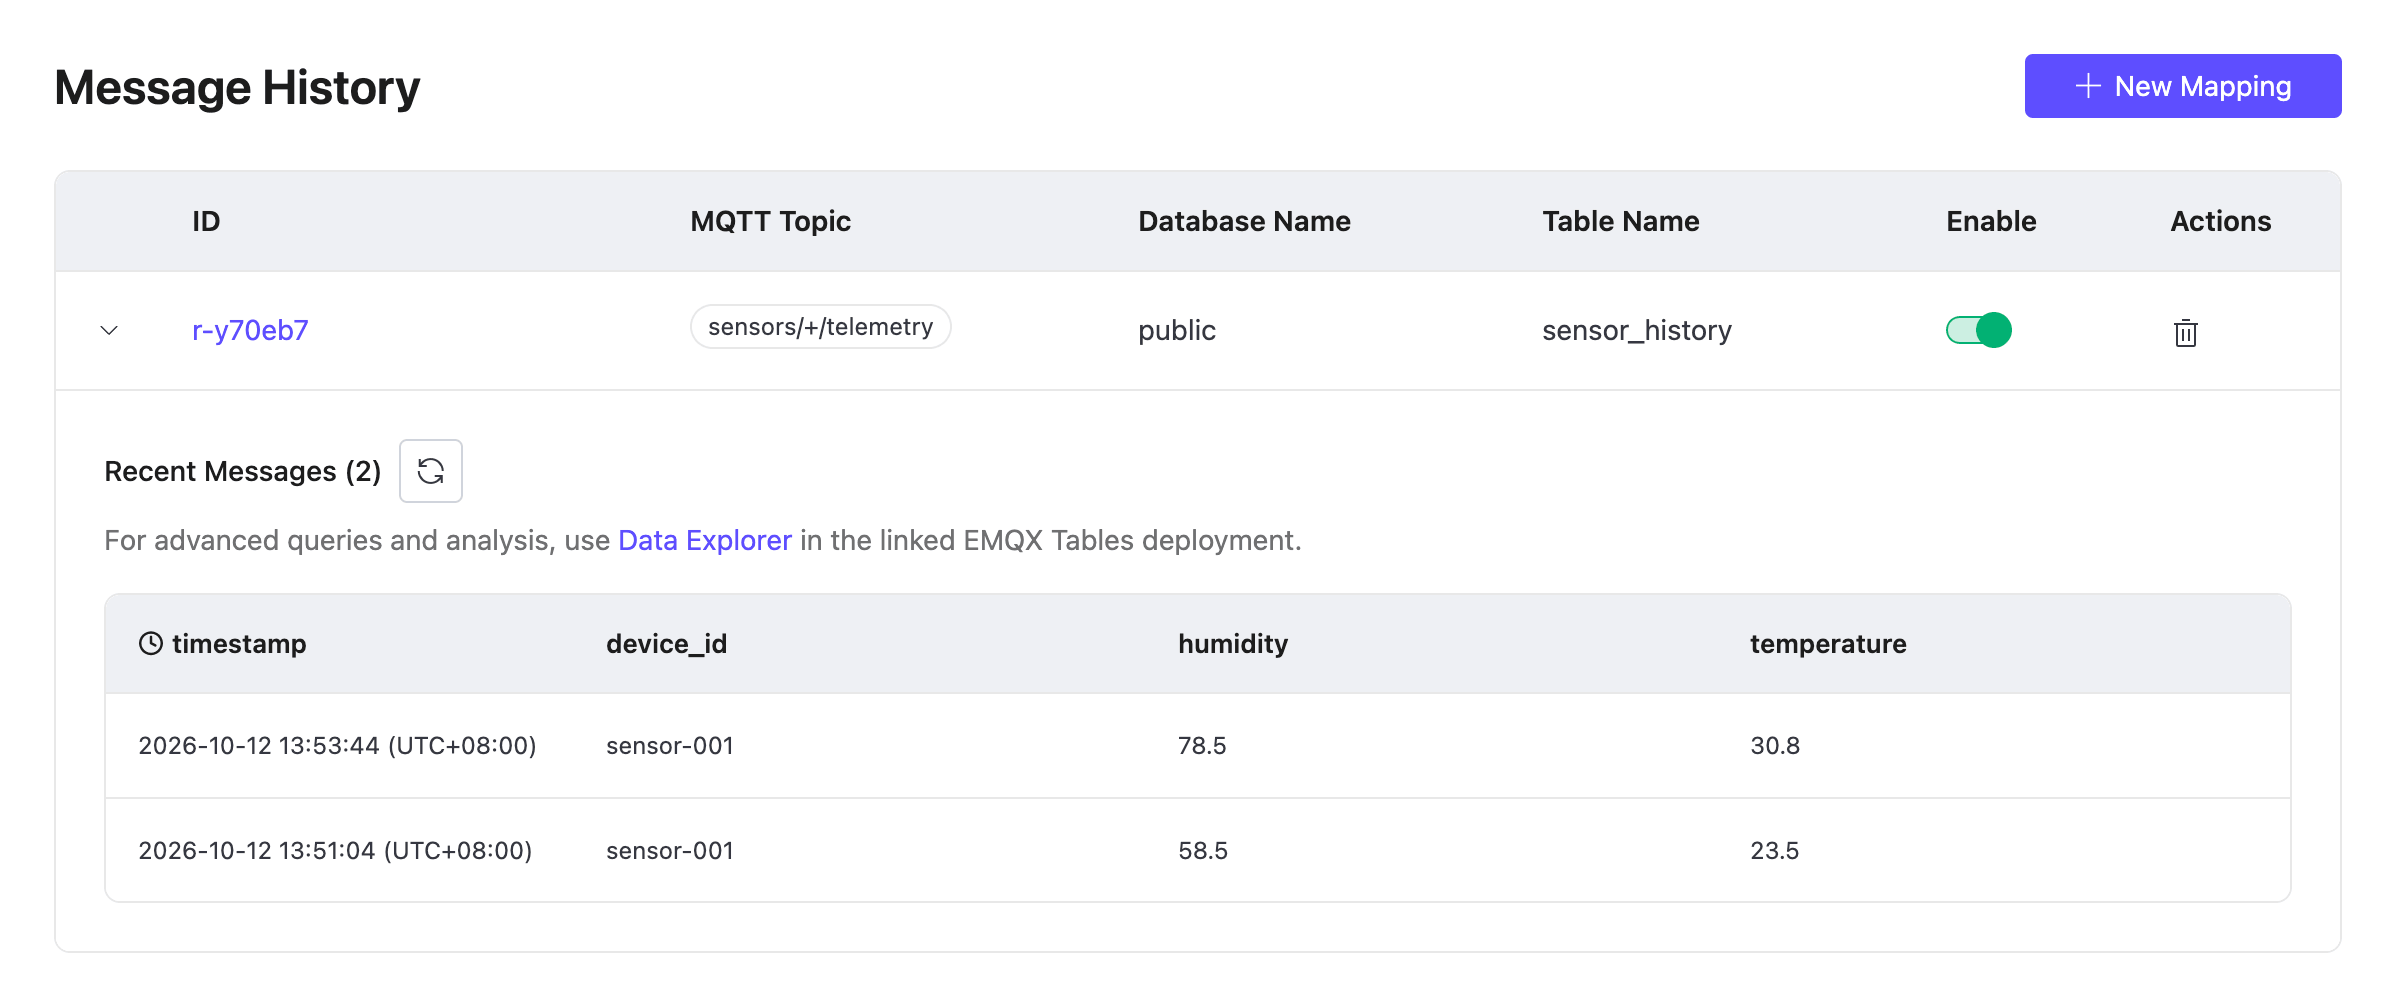
You can enable, disable, or delete a mapping from Message History:
- Use the switch in the Enable column to disable or enable a mapping. Disabling a mapping stops new writes but keeps data already stored in EMQX Tables.
- To delete a mapping, click its delete icon and enter the mapping ID in the confirmation dialog. Deleting a mapping does not delete the target table or stored data. If no other mapping uses the associated connector, the connector is also removed.
The following table summarizes how these operations affect stored data:
| Operation | New Writes | Stored Data | Target Table |
|---|---|---|---|
| Disable the mapping | Stop | Retained | Retained |
| Delete the mapping | Stop | Retained | Retained |
| Data reaches its TTL | Continue | Data older than the TTL expires | Retained |
Edit the Underlying Data Integration
Click the mapping ID, then click the edit icon to open its rule in Data Integration. You can edit the Rule SQL, description, and action settings, or enable or disable the rule and action.
The Enable switch in Message History controls the rule only. If the associated action is disabled in Data Integration, the mapping can still appear enabled, but matching messages are not written to EMQX Tables.
The connector is locked. In Data Integration and Flow, the Cloud Console does not let you add sink actions, change fallback relationships, or delete the managed rule or action. The generic Data Integration APIs do not enforce all of these restrictions. Do not use these APIs to delete Message History resources or change their connector or fallback relationships. To delete a mapping and its managed rule and action, return to Message History. The connector is also removed if no other mapping uses it.
Troubleshoot Message History
Open the mapping details and check the Success, Failed, and Dropped metrics and the recent-message status. Then use the section that matches the observed result.
Delivery Metrics Do Not Change
- Verify that the mapping is enabled in Message History and that its action is enabled in Data Integration.
- Verify that the published topic matches the mapping's MQTT topic filter.
- Publish a new matching message. Messages published before the mapping was created or while it was disabled are not copied into the table.
Failed or Dropped Increases
- Open Diagnostics -> Logs, set Error Type to Data Integration, and filter by the mapping's Rule ID, Action Name, or Connector Name to identify the error. For filter details, see Deployment Logs.
- Make sure that the Tables deployment is running in the same network as the Broker.
- Verify the Tables credentials and confirm that the user has
SqlSelectandSqlInsertaccess to the database. - Compare the mapped values with the target table schema. A write can fail when a value does not match the table's existing column type or when the timestamp is invalid.
- Verify that a payload timestamp uses the selected precision. For example, do not configure a timestamp in seconds as milliseconds.
- Check the deployment's data integration TPS and connector limit. Message History connectors share the Broker's connector limit with Data Integration connectors.
Recent Messages Do Not Appear
- If the target table is not ready, publish a matching message to trigger its first successful write.
- Query the target table from Data Explorer.
- If Data Explorer returns records, refresh the recent-message preview.
- If the preview still fails to load, continue using Data Explorer to verify the stored data.
Mapping Writes to an Existing Table
Inspect the existing table's timestamp column, TTL, and schema. The mapping's connector settings do not change an existing table.